


What is roman glass and why it matters for collectors
Roman glass is most often described in conservation and museum literature as soda-lime-silica glass that frequently shows a color range from pale blue-green to deep cobalt, and those color signals are useful when evaluating pieces of roman glass jewelry as an initial clue to origin.
At a technical level, many museum overviews explain that early Roman workshops produced blown and sometimes mould-formed wares with characteristic manufacturing marks such as trailing where threads of glass were applied, asymmetric blowing scars, and occasional mold lines on later, more standardized workshop products; these marks help place a piece within a working practice rather than proving age on their own The Metropolitan Museum of Art.
When authors describe Roman glass composition, they are referring to a soda-lime-silica recipe that contains natural impurities and coloring ions which yield the familiar palette from pale aqua to darker blues; this chemical baseline influences weight, transparency, and how surfaces weather over time Corning Museum of Glass.

For collectors, those compositional and workshop traits matter because they set realistic expectations about condition and typical wear for wearable pieces. A small intaglio set in a silver hoop or a fragmentary bead may appear differently from a full vessel, and understanding the common production signs helps interpret listing photos and condition notes.
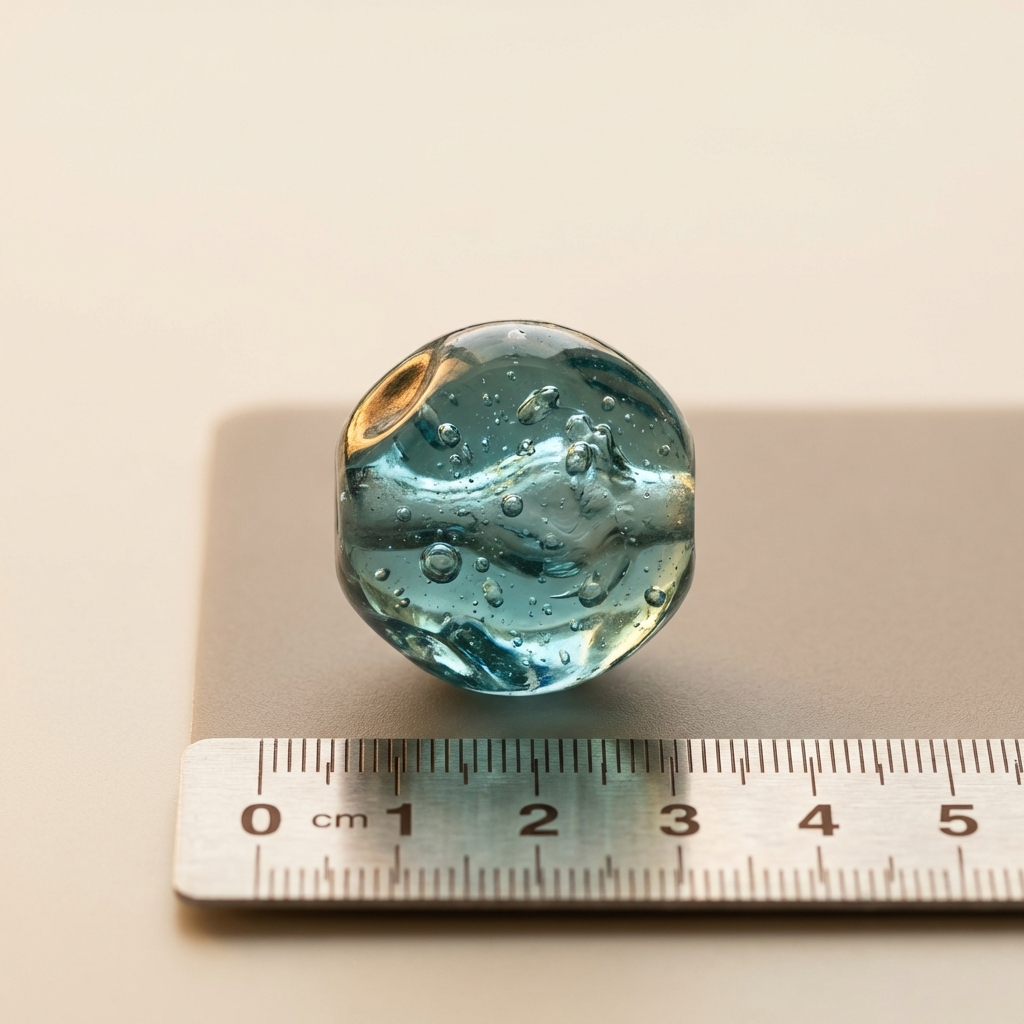
Hand-blown objects often retain irregular entrapped air bubbles and asymmetries created during forming; such features are commonly recorded in catalogues and can be visible even on small jewelry components when viewed with magnification The Metropolitan Museum of Art.
Typical composition and color range
That palette is not an absolute rule. Weathering, burial chemistry, and later restorations can shift appearance, so color alone should be treated as an indicator rather than proof of age.
How glass was made and common workshop marks
Later workshop methods produced more standardized shapes and occasional mold seams, so the presence of a neat, repetitive seam may suggest a later workshop product or reproduction technique. Use these observations to form questions for a seller rather than as stand-alone authentication.
Core visual features to look for on roman glass jewelry
Visual inspection is the starting point for roman glass identification; focus first on color, entrapped bubbles and the overall form before moving to surface details.
Entrapped, irregular bubbles that differ in shape and size across a piece are consistent with hand-blown glass; modern machine-made glass tends to show exceptionally uniform bubble distribution or none at all, which can be a practical red flag in images Corning Museum of Glass.
quick visual inspection workflow for glass jewelry
Use a magnifier and backlight
Color, entrapped bubbles and blowing marks
Look closely for bubbles that interrupt decoration or lie in random patterns rather than repeating evenly; those irregular patterns are a common signal of older, hand-formed glass and are described in museum conservation notes as typical of blown work Corning Museum of Glass.
Blowing marks and trailing where threads of molten glass were applied often survive on small objects and can be a meaningful part of interpretation, but they are not definitive proof of an ancient date without supporting documentation.
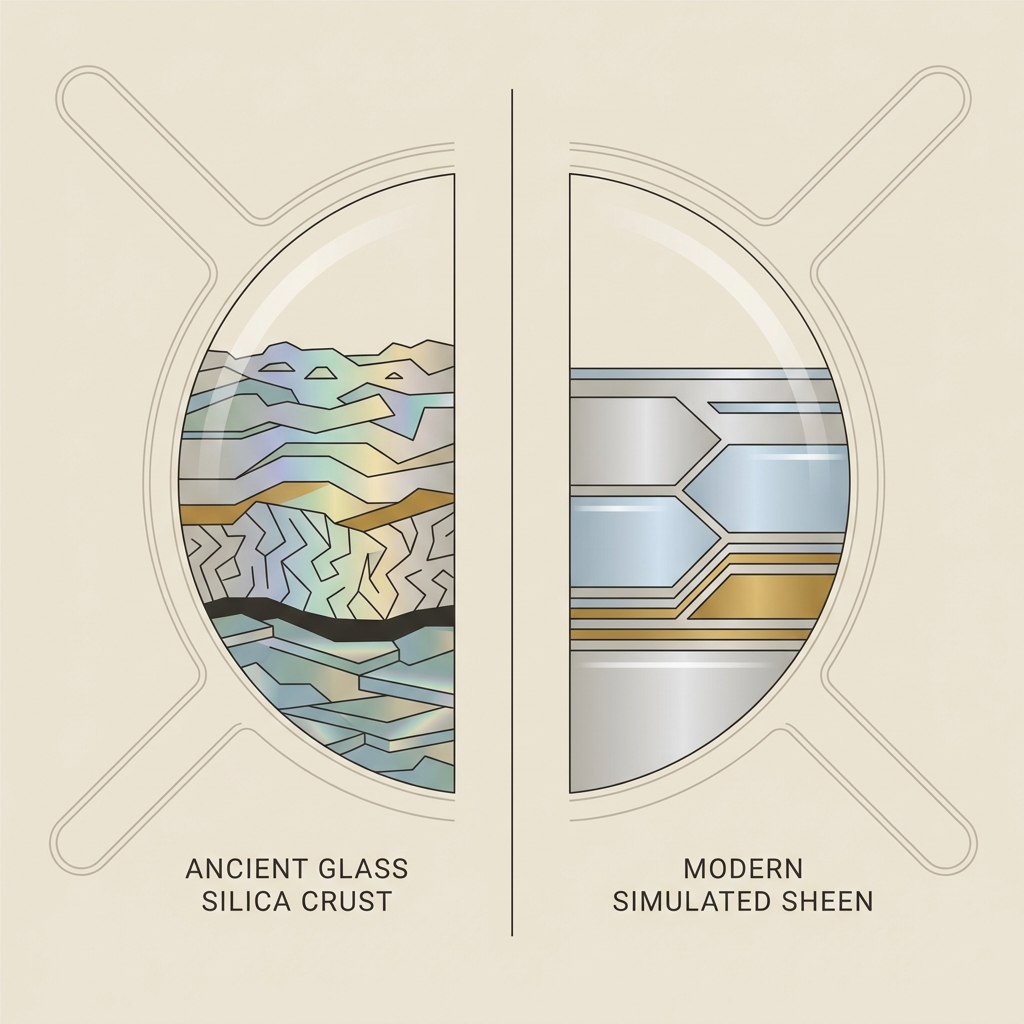
Weathering, iridescence and burial crusts
Long-term burial or marine exposure commonly produces corrosion layers that appear as hydrated, iridescent surfaces or thin silica-rich crusts; conservation literature highlights differences in microstructure between genuine weathered glass and artificially applied surface effects British Museum conservation resources.
True weathering often shows subtle flaking, layered translucency, and micro-roughness that changes under magnification, whereas many artificial ageing methods produce superficial, uniform rainbow sheens that lack depth and the microstructural signs described in professional studies.
Practical at-home checks for initial screening of roman glass jewelry
Use simple, low-risk checks to screen listings for obvious modern replicas before committing to a purchase or paying for testing. A careful initial inspection can save time and prompt informed questions for the seller.
Begin with a weight-to-size sense: feel the item in hand if possible or ask the seller for gross weight and dimensions. Roman soda-lime-silica glass typically has a weight-to-size ratio that collectors learn to expect, so a very light object for its size or the opposite extreme can be a reason for caution Museum conservation guidance.

Weight and light transmission checks
View items against a strong, diffuse backlight to assess thickness variations and bubble patterns; real hand-blown pieces often show variable thickness and irregular bubbles that reveal themselves more clearly when light passes through the glass, while many modern replicas show unnaturally uniform thickness and bubble distribution Corning Museum of Glass.
If you cannot examine the item in person, request high-resolution photos with a backlit view and a scale reference so you can judge thickness and bubble patterns before buying.
UV lamp inspection and close-up for seams or tool marks
A short UV check can be informative: many modern additives and some modern glass formulations fluoresce under long-wave UV, whereas most ancient soda-lime-silica glasses do not show strong, modern-looking fluorescence; use this test as a screening step and treat unexpected fluorescence as a cue to ask for more information or testing Museum conservation guidance.
Under magnification, look for neat mold seams, sharp modern tool marks, excess adhesive or patching that indicate recent joining; these tell-tale signs are straightforward to spot at 10x to 30x magnification and are commonly cited in collector guidance as reliable visual red flags when present.
Remember that at-home checks are limited. They can indicate likely modern manufacture or obvious restoration, but they cannot confirm ancient origin; when a piece is valuable or has unusual features, plan to pursue laboratory testing.
When to seek scientific testing: XRF, Raman, SEM-EDS and LA-ICP-MS explained
Laboratory and portable scientific methods are the standard way to move from plausible visual identification to a stronger compositional case for age and origin; each method delivers different information that helps specialists interpret recipes and traces.
Portable XRF provides elemental fingerprinting that is often sufficient to distinguish broad compositional families and to check for modern contaminants, while Raman and FTIR identify surface phases such as corrosion products; museums and conservation programs use these non-destructive tools as first-line analyses when access permits Review of non-destructive analysis for archaeological glass. Portable XRF practice is also discussed in site studies such as portable XRF studies.
Consider laboratory testing when provenance is incomplete, when the piece has unusual features that affect attribution, or when the expected value justifies the cost; non-destructive portable tests are a good first step, and higher-resolution lab methods follow if questions remain.
Higher-resolution techniques such as SEM-EDS and LA-ICP-MS give finer compositional detail and trace-element patterns that can be compared to reference datasets for provenance studies; these methods usually require sampling or specialist lab access and so are reserved for cases where provenance is incomplete or the material value justifies the cost Getty Conservation Institute overview.
What each method tells a collector
Portable XRF can indicate major and some minor element trends that align with historical recipes, helping discriminate soda-lime-silica from other formulations and spotting modern additives; caretakers and conservators often recommend it as an accessible, non-destructive first step Review of non-destructive analysis for archaeological glass.
Raman and FTIR complement XRF by characterizing corrosion layers and surface silica phases, which clarifies whether iridescence is a true hydration product from burial or a surface treatment applied later.
Non-destructive versus invasive tests and access options
SEM-EDS offers micro-scale elemental mapping useful for studying corrosion structure and manufacturing traces, and LA-ICP-MS yields trace-element fingerprints for sourcing, but both typically require laboratory infrastructure and specialist interpretation to be meaningful Getty Conservation Institute overview.
Collectors can often arrange portable XRF scans through local universities, conservation departments or commercial labs that offer field services; ask in advance about data formats, comparison datasets and whether the provider includes interpretive reporting rather than raw numbers alone. For practical guidance on handheld XRF use see the Getty resource Handheld XRF in Cultural Heritage.
Interpreting condition, restoration notes and provenance in listings
Condition notes should be specific and transparent; a useful listing explains what was stabilized, what repairs were carried out, what has been left untouched, and it should include clear photos of problem areas so buyers can judge structural soundness and cosmetic intervention British Museum conservation resources.
Provenance statements vary in quality. Helpful elements are a clear collection history, prior ownership notes, dates and locations of earlier sales or exhibitions, and any verification letters from independent specialists; these items materially change how a collector reads a piece because they reduce uncertainty and establish a chain of information.
@auroraantiqua inspection checklist
If you want a simple, printable checklist to take when assessing listings, download the companion checklist and use it to note bubble patterns, backlit photos, reported weights, and any restoration language provided by the seller.
When provenance is partial, ask sellers for additional photographs, measurements, and any lab reports; even fragmentary documentation can direct further inquiry and reduce the need for costly testing when the history is clear enough. You can also consult our questions and answers hub for common queries.
What responsible sellers include in condition notes
A responsible condition note describes exact repairs, names materials used in restoration, and states whether original surfaces have been cleaned or left in situ; restoration notes are important because restoration can alter surface chemistry and visual cues used in identification.
A clear seller will also say whether previous owners documented the piece with testing or have supportive paperwork, and they should allow time for follow-up questions before sale.
How provenance and documentation change how you read a piece
Provenance that includes collection history, prior sale catalog references or independent verification letters shifts a piece from speculative to researchable, although even good documentation can be supplemented by compositional testing if questions remain about materials or unusual treatments.
A thoughtful seller narrative combined with good photography and measurements allows a collector to weigh risk and to make an informed request for testing when appropriate; Aurora Antiqua presents pieces with condition notes and context to help buyers understand what they are purchasing. You can browse the Ancient Roman Rings collection for related examples.
Red flags and common mistakes collectors make with roman glass jewelry
There are practical red flags to watch for: perfectly uniform color without irregular bubbles, clear mold seams, visible modern tool marks, unexpected adhesives or patching, and unusual UV fluorescence are all reasons to pause and ask questions Museum conservation guidance.
Common mistakes include relying on a single photograph, assuming that iridescence is automatic evidence of age, or accepting vague provenance claims without supporting documentation; these errors often lead to overconfidence and later disappointment.
If multiple red flags are present, request detailed photos, ask for nondestructive testing results, or seek an independent specialist opinion. Doing so is a prudent step rather than an accusation and helps maintain trust in the collecting process.
Examples and scenarios: reading listings and photographs
Example 1: worn carnelian-set roman ring and what to ask
Scenario read: A listing shows an ancient silver hoop set with a worn carnelian intaglio and a small supporting blue glass bead. The silver shows condition notes about stabilization, while the blue bead has a thin iridescent surface.
Checklist actions: Ask for high-resolution, backlit images of the bead, magnified photos of the glass surface, and clarification of whether the carnelian was tested or simply visually identified. If the bead shows irregular bubbles and a layered burial crust, those are reasonable indicators to pursue further; if the bead fluoresces under UV or shows a neat mold seam, treat with caution Corning Museum of Glass.
Example 2: a blue glass bead with marine encrustation
Scenario read: A bead photographed with white encrustation and a crumbly outer layer that might be marine encrustation. Photos are taken outdoors with variable lighting.
Checklist actions: Request macro images under controlled lighting, ask for cross-sections if available from a conservator, and consider asking for portable XRF or surface Raman to confirm the nature of the encrustation and the glass body; such steps help distinguish true marine-weathered glass from surface-applied encrustation or modern coatings Getty Conservation Institute overview.
Checklist and next steps for buying roman glass jewelry
Quick checklist: 1) Request backlit photos and scale, 2) Check for irregular bubbles and blowing marks, 3) Look under magnification for seams or tool marks, 4) Ask about condition and restoration notes, 5) Request provenance details and any lab reports, 6) Consider portable XRF or specialist reporting when value or doubt is high Review of non-destructive analysis for archaeological glass.
Storage and care: Keep glass jewelry stable in a padded box out of direct sunlight, avoid rapid temperature changes, and retain all documentation and photographs in a file with the object; these small steps preserve both condition and the research trail.
When to escalate: If documentation is lacking and the piece is valuable or historically unusual, plan for laboratory testing and specialist interpretation rather than a private visual verdict. Local university conservation departments, accredited labs, or trusted commercial services can provide testing and interpretive reports.
No. At-home checks are useful to flag obvious replicas or repairs but cannot confirm ancient origin; laboratory analysis and specialist interpretation are needed for stronger attribution.
Not always. UV fluorescence can indicate modern additives but is not definitive because some modern and some ancient materials may not fluoresce; use it as a preliminary screen.
Contact university conservation departments, accredited archaeological science labs, or commercial analysis services that offer portable XRF and laboratory follow-up; ask if interpretive reporting is included.
References
- https://www.metmuseum.org/toah/hd/glss/hd_glss.htm
- https://www.cmog.org/article/roman-glass
- https://www.britishmuseum.org/our-work/conservation-and-science/objects-conservation/glass
- https://www.museumconservation.org/practical-guidance/identifying-ancient-glass
- https://auroraantiqua.store/products/roman-silver-ring-auriga-red-jasper-intaglio-of-cock-drawing-a-chariot-driven-by-a-mouse-1st-3rd-century-ad-eu-57-us-7-5
- https://www.sciencedirect.com/science/article/pii/S0003269721001234
- https://pmc.ncbi.nlm.nih.gov/articles/PMC9502536/
- https://www.getty.edu/conservation/our_projects/science/glass/
- https://www.getty.edu/conservation/publications_resources/pdf_publications/pdf/handheld-xrf-cultural-heritage.pdf
- https://auroraantiqua.store/blogs/questions-and-answers
- https://auroraantiqua.store/
- https://auroraantiqua.store/collections/ancient-roman-rings